iPhoto offers numerous options for sharing image files with other people. For example, you can start a photocast, turn on iPhoto’s sharing options, or send photos in an e-mail. But the program doesn’t offer an easy way to give multiple users or multiple Macs full access to an entire iPhoto library—including keywords, albums, and ratings.
Perhaps you want to assign keywords in your spare time at work, and then post albums to the Web from your iMac at home. Or maybe you and your spouse want to be able to upload photos to a joint library from separate user accounts. Whether you have multiple Macs, multiple users, or both, there are only a few ways to share your iPhoto library seamlessly. Though the three options I describe in this article require a bit of setup work, you won’t need any additional software or arcane Unix commands. The option you choose will depend on your setup.
Keep in mind that no matter which of these methods you use, only one person at a time may use a shared iPhoto Library folder.
Option 1: Use a Shared Hard Drive
One of the easiest ways to give multiple users or multiple Macs access to the same iPhoto library is to put the library on an external hard drive that everyone can reach. This option eliminates any problems with permissions and frees up disk space on your Mac.
If you have an iPod with unused storage space, you can use it as an external hard drive and take your library with you wherever you go (to set this up, select Enable Disk Use in iTunes’ iPod preference pane).
Keep in mind that external hard drives are more vulnerable to damage or theft. If you choose this option, I recommend regular backups to ensure that you don’t lose all of your photos in one stroke of bad luck.
Step 1 In the Finder, select the icon for the external hard drive on which you want to store the shared iPhoto Library folder. Choose File: Get Info to open the drive’s Info window.
Step 2 In the Ownership & Permissions pane (if the pane isn’t visible, click on the triangle next to its name), make sure the Ignore Ownership On This Volume option is turned on, and then close the Info window.
Step 3 In the Finder, locate the iPhoto Library folder you want to share (you’ll find it in the user folder’s Pictures folder). Then drag the folder to the external hard drive.
| |
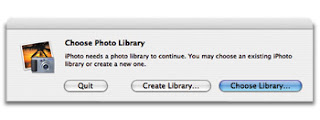
| Missing in Action : If you move your iPhoto library to a new location (to make it easier to share with others), you’ll need to tell iPhoto where to look for it. Hold down the option key while launching the program to bring up the Choose Photo Library dialog box. |
Step 4 The first time you open iPhoto in each account or on each computer, hold down the option key while launching the program. In the Choose Photo Library dialog box that appears (see the screenshot to the right), click on Choose Library. Navigate to the iPhoto Library folder on the external hard drive and click on Open. You should have to do this only once. The next time you open iPhoto, it will know to look on the specified drive for your library.
Tip If the two Macs in question are your own laptop and desktop systems, consider leaving the iPhoto Library folder on the laptop. When you need to access the library from your desktop, connect the two computers via FireWire and then boot the laptop in FireWire Target Disk Mode (hold down the T key while the laptop starts up). You’ll now be able to use it as an external hard drive.
Option 2: Use a Shared Disk Image
Thanks to Mac OS X’s permissions system, sharing resources between two or more user accounts on the same Mac can be a tricky process. Sure, you could place your iPhoto library in an account that every user has access to, but in doing so you’d lose the benefits of individual accounts—personalized workspaces, secure access to personal files and documents, and so on.
If you want to keep user accounts secure but don’t have an external hard drive, you can work around OS X’s permissions conundrum by placing a disk image of your iPhoto library in the Shared folder for other users. A disk image is a special file that OS X treats as though it were an external hard disk, letting you write to and read from it.
So why use a disk image instead of the iPhoto Library folder? If you store the iPhoto Library folder in the Shared folder, iPhoto incorrectly sets permissions on thumbnails for newly imported images. By default OS X ignores permissions on a disk image. The downside of using a disk image is that you’ll have to mount the disk image before each iPhoto session, and unmount it before anyone else can use it.
Step 1 Open Disk Utility (/Applications/Utilities), and click on the New Image button.
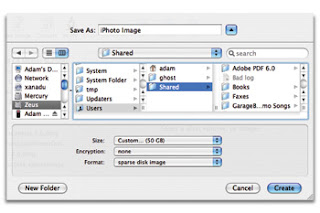
Create a Disk Image When you’re creating a disk image for your iPhoto library, be sure to give yourself plenty of room and to set the Encryption menu to None. Then set the Format menu to Sparse Disk Image. |
Step 2 In the Save As text field, enter a name for the disk image (for example, iPhoto Image), and then save it in the /Users/Shared folder. From the Size pop-up menu, choose Custom. Set the largest imaginable size for your library (don’t skimp— you can’t expand the image later, and choosing a larger size doesn’t use any more space now). Leave Encryption set to None (unless those photos are exceedingly private), and then choose Sparse Disk Image from the Format pop-up menu (see the screenshot on the right). When you’re done, click on Create. Disk Utility will create the disk-image file and mount it as a volume.
Step 3 In the Finder, open the Shared folder (/Users/Shared) and select the new disk image file. Choose File: Get Info to open the Info window.
Step 4 In the Ownership & Permissions pane, click on the Details triangle, and then click on the lock icon next to the Owner pop-up menu. Choose Unknown from the Owner pop-up menu, enter your administrator password when prompted, and then close the Info window.
Step 5 Drag the iPhoto Library folder from the user folder’s Pictures folder to the mounted disk image you just created.
Step 6 In the currently active account, hold down the option key while launching iPhoto. When the Choose Photo Library dialog box appears, click on Choose Library and select the iPhoto Library folder from the mounted disk image.
Step 7 Quit iPhoto. Unmount the disk image by dragging it to the Eject (Trash) icon in the Dock.
Step 8 Switch to the second user account via Fast User Switching. In the Finder, open the Shared folder and double-click on the disk-image file to mount it. Then repeat step 6, so iPhoto knows where to find the iPhoto Library folder. You’ll need to do this for each user who will be accessing the disk image.
When you’re done, every user should be able to launch iPhoto normally. However, each person must mount the disk image before launching iPhoto and must unmount the disk image before anyone else can use it. You can easily automate the process of mounting the disk image and opening iPhoto (go to macworld.com/1263 to download the necessary Automator workflow).
Option 3: Use a Shared Network Volume
If you have multiple Macs networked together via 100BaseT or faster Ethernet, you can give everyone access to a single iPhoto library by plac-ing it on a shared network volume (though you can use an 802.11g wireless network for this, performance may be debilitatingly slow). Here I’ll show you how to use your own Mac to share the iPhoto library. An even better option might be to store the shared iPhoto Library folder on a central file server accessible to all networked Macs. If you go that route, just make sure that everyone is allowed to log in to the server account that holds the iPhoto Library folder.
Step 1 On the Mac that will host the shared iPhoto Library folder, open the Sharing preference pane, turn on the Personal File Sharing option, and click on the Start button.
Step 2 On each remote Mac, open a new Finder window and select the Network icon in the sidebar. Select the name of the host Mac and click on Connect. Enter the user name and password for the account that owns the iPhoto library, and activate the Remember This Password In My Keychain option. In the next dialog box, select your home directory as the volume to mount and click on OK. The network volume will now appear in the Finder’s sidebar.
Step 3 While still on the remote Mac, hold down the option key as you launch iPhoto. Click on Choose Library, and then select the iPhoto Library folder on the shared network volume.
After performing these steps, you and everyone else sharing the iPhoto Library folder can launch iPhoto normally.
One last tip
If you’re comfortable entering Unix commands into Terminal, there’s an easier way to share an iPhoto Library folder across multiple accounts on the same Mac. The secret lies in using Access Control Lists in OSX. For details on setting this up, go here.
courtesy of Adam C. Engst, Macworld.com
No comments:
Post a Comment