- WiMax
- GiFi Networking(Backwards compatible with WiFi-N)
- UWB(wireless HDMI, WUSB, etc.)
- Bluetooth 3.0
- WiMax
- GiFi Networking(Backwards compatible with WiFi-N)
- UWB(wireless HDMI, WUSB, etc.)
- Bluetooth 3.0
I'm flat out tired of waiting for AV in adium, and quite frankly, I don't really like the app anyway. Sure, it's fine for a free open-source program, but it's buggy and kind of ugly.
I would absolutely love to see Apple release a version of iChat that would eliminate the need for Adium all together. I'll call it iChat X.
In addition to all the features iChat already provides, iChat X would include access to the MSN, Yahoo, MySpace, Facebook, ICQ, Googletalk, Skype, etc., networks with full AV capabilities for those networks that support it.

I Know I'm not the only one who'd love to see Apple develop an all-in-one networked home entertainment device. The rumors and ideas are all over the web.
Well, here's my completely unrealistic dream Apple HDTV...
- 20", 40", and 60" LED DLP 1080p HDTV's
- 2.0GHz dual-core P.A. Semi SOC with an advanced Multicore GPU capable of over a teraflop computational performance
- 4GB RAM
- 1TB SSD
- Built-in Airport Advanced networking card
- A built-in Internet HD television service including all the major cable and satellite networks, as well as your local programming. - Get rid of your cable or satellite and only have to pay for your high speed internet.
- Built-in channel guide.
- Built-in DVR
- Built-in iSight camera
- Wireless Apple Multitouch keyboard/trackpad
- Built-in motion/virtual reality based gaming/fitness system far more advanced than Wii, PS3, or Project Natal
- Safari Internet Browsing
- iTunes Store access
- Ability to install and play Mac, and iPhone/iPod games
- Support for iPhone/iPod apps
-Built-in iPhoto, iMovie, iWeb, Pages, Keynote, Numbers, TextEdit, Preview, Mail, iCal, and iChat apps
- Optional wireless bluetooth accessories like multi-axis accelerometer based game controllers, headsets, mics, etc.
- Complete integration with the Apple iServe, including GiFi backup, streaming, and storage of games, movies, music, DVR and other data.
- Built-in ultra-high fidelity 3.1 sound system(with optional wireless satellite speakers for 5.1)
- Integrated home security system(with optional multiple wireless security cameras)
-Built-in alarm clock/sleep timer
- Remote viewing/control app for iPhone/MacTouch similar to Slingbox, etc.
Learn how to move your iTunes Music folder to a different location on your Mac. To move the iTunes Music folder on a Windows PC, see this article.
If your hard drive is nearly full after loading all your music and other media into iTunes, or if you just want to move all those music and media files to another hard drive on your system, here's a way to make the move while retaining all your playlists, ratings, and play history.
iTunes 7 for Mac, iTunes 8 for Mac
First make sure that the "Keep iTunes Music folder organized" option is checked in iTunes Preferences:

Once you've done that, follow the next set of steps to change your iTunes Music library location to the new drive and then consolidate your library to the new location. This not only copies your audio and media files over, it also retains your ratings and playlists. Note: If you move your music and media library to an external hard drive, you will need to have that drive connected to access your files. No matter what, it's always a good idea to have a backup of the media you have in iTunes.
If you move your library to an external drive, you'll need to power up and connect the drive before starting iTunes. If you don't, iTunes will prompt you to either locate the library or to create a new library (which will result in an empty library).

The mouse is the new dodo. The computer mouse that is. And maybe not completely, but the antiquated user interface device is growing more and more unnecessary in a modern world full of multitouch trackpads.
The mockup above may look a little silly at first. After all, that is one extremely looooooong keyboard. But, when you think about it logically, the trackpad consumes the space that a mouse would usually use.
The keyboard/trackpad combo would of course have to be fully wireless.

Mac OSX 10.6 "Snow Leopard" is due out anytime now, and there are a few simple tweaks that I hope to see apple address with this installment of the next generation system software.
1. A wider library of network device icons. All the Apple devices on your network have appropriate icons in the finder(Time Capsule, AppleTV, MacBooks, iMacs, Mac Minis, Mac Pros, eMacs, etc...) but every other type of network device shows up as a generic PC monitor with the so called "blue screen of death" on it. I hope Apple creates either a big library of device icons, or a way for users to change the icons of shared/network devices. If, for instance, I have a WD ShareSpace on my network, I would like the icon to be a representation of it.
2. The unified 'Marble' theme that everyone keeps talking about. I think it'd be a thing of beauty. There are too many different UI elements in the current OS.
3. Full OpenCL integration across every application and system function. Just imagine the possibilities for media apps like iLife with all that parallel processing power.
4. Multi-client iChat. Full support for AIM, Bonjour, Jabba, MSN, Y!, Myspace, Facebook, ICQ, and Google Talk with video/voice. There would be no reason to resort to Adium any longer.
5. Open API. I think third party developers should be able to offer updates through Software Update.
6. Wine-like execution of Windows binaries on x86 machines. No more need for Crossover(sorry Code Weavers).

iLife X (iLife '10) feature requests/wishlist
In addition to current iLife ('09) application features:
All iLife X apps:
-OpenCL integration for increased parallel computing power.
-New unified iLife GUI based on the new OSX Snow Leopard 'Marble' theme.
-Enhanced system integration.
iMovie X
-3rd-party .qtz plug-in support. Effects, themes, titles, maps, transitions, etc.
-Stop-animation mode.
-Music video mode.
-Multiple camera support.
-Built-in advanced keying and compositing. Lights, blasts, impacts, particles, green-screen, and other animations. Something like VisionLab Studio.
-More built in effects, themes, titles, maps, and transitions.
iWeb X
-Integrated dynamic content. Think SproutBuilder or Wix.
-Master Pages. I hate how if you use an image on two separate pages it has to reload when you click on the second page. It looks amateurish in my opinion.
-Built-in widget library. Jukeboxes, video players, mini-pages, lightboxes, slideshows, etc.
-Built-in dynamic transitions.
-Fully customizable site-preloader page.
-3rd-party plug-in/widget support.
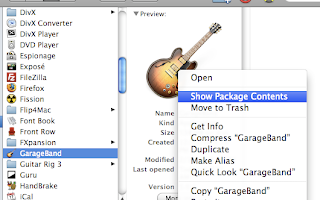
GarageBand X
-Ability to program chord/key changes, and time signature changes.
-96khz "best" mode
-Multitrack MIDI recording. For example, use a v-drum kit to record drums while you simultaneously record keyboard parts on a synth controller, etc. Using a pulldown menu in the track editor you would select your midi input device, just the same way you select an audio input on a real instrument track.
-Remote session recording. I live in Minneapolis, you live in Tokyo, our vocalist is in Vancouver, and our drummer lives in London - and we all collaborate/record together. There is a great AU plug-in that exists called Virtual Glass, but the services cost is way out of most users ballpark. I imagine an apple version that uses iChat technology to do it even better with a beautiful GarageBand GUI. In addition, imagine using screen-sharing to collaborate on mixing the final product over the internet.
-Deeper, more advanced right-clickable audio editing capabilities in the editing pane. Cut, Copy, Paste, Silence, Fade, Split, Join, Normalize, Reverse.
-Sample-accurate editing in the editing pane.
-Improved support for REX, and Acid Loops.
-Support for loading Reason Refills, Kontakt libraries, and 3rd-party EXS24 libraries into the generator as well as improved Soundfont library support. I imagine clicking on a box next to the generator pulldown menu, and having a generator GUI pop-up.
-Built-in arpeggiator on Software Instrument tracks.
-Built-in chord generator on Software Instrument tracks.
-An integrated "Remove Noise" slider in the track info/editor of Real Instrument tracks, based on the advanced noise removal algorithm in Soundtrack Pro.
-A "file browser" in the media browser/loops pane where you can search files and folders from your entire hard drive, attached drives, or networked drives.
-Flex Time/Pitch editing similar to Celemony Melodyne.
-Bounce-In-Place.
iPhoto X
-More advanced image editing. Filters, effects, brushes, and tools. See Nolobe Iris.
-Export Library to iDVD.
-3rd-party plug-in support.
-Ability to optimize photos for the web.
-iPhoto Home Sharing
iDVD X
-Complete disc burning/archival and distribution utility. BD, DVD, CD, VCD, YouTube, File-Server, etc.
-Better and easier customization tools. More flexible GUI.
-Tons of more built-in themes, titles, animations, and transitions.

Rumors have been circulating for quite some time now about a secret Apple project to create a new Mac OSX based tablet computer. I for one believe that there is indeed fire beneath all the smoke, when it comes to this rumor.
Here is what I would like to see in a new MacBook Touch tablet:
-Of course, a Multitouch LCD.
-Similar processing, GPU, and memory specs to the current unibody MacBook.
-An updated Airport card that adds WiMax, GiFi Networking, and WUSB so that the device would need no ports, other than an iPod-style dock connector, and an optical minijack audio output.
-A 512GB or 1TB SSD.
-Optional AT&T 3G iPhone web services.
-Desktop docking/charging station stand with a compliment of USB ports and a Mini DisplayPort for using with a keyboard/mouse and second/external display.
iPhoto offers numerous options for sharing image files with other people. For example, you can start a photocast, turn on iPhoto’s sharing options, or send photos in an e-mail. But the program doesn’t offer an easy way to give multiple users or multiple Macs full access to an entire iPhoto library—including keywords, albums, and ratings.
Perhaps you want to assign keywords in your spare time at work, and then post albums to the Web from your iMac at home. Or maybe you and your spouse want to be able to upload photos to a joint library from separate user accounts. Whether you have multiple Macs, multiple users, or both, there are only a few ways to share your iPhoto library seamlessly. Though the three options I describe in this article require a bit of setup work, you won’t need any additional software or arcane Unix commands. The option you choose will depend on your setup.
Keep in mind that no matter which of these methods you use, only one person at a time may use a shared iPhoto Library folder.
Option 1: Use a Shared Hard Drive
One of the easiest ways to give multiple users or multiple Macs access to the same iPhoto library is to put the library on an external hard drive that everyone can reach. This option eliminates any problems with permissions and frees up disk space on your Mac.
If you have an iPod with unused storage space, you can use it as an external hard drive and take your library with you wherever you go (to set this up, select Enable Disk Use in iTunes’ iPod preference pane).
Keep in mind that external hard drives are more vulnerable to damage or theft. If you choose this option, I recommend regular backups to ensure that you don’t lose all of your photos in one stroke of bad luck.
Step 1 In the Finder, select the icon for the external hard drive on which you want to store the shared iPhoto Library folder. Choose File: Get Info to open the drive’s Info window.
Step 2 In the Ownership & Permissions pane (if the pane isn’t visible, click on the triangle next to its name), make sure the Ignore Ownership On This Volume option is turned on, and then close the Info window.
Step 3 In the Finder, locate the iPhoto Library folder you want to share (you’ll find it in the user folder’s Pictures folder). Then drag the folder to the external hard drive.
| |
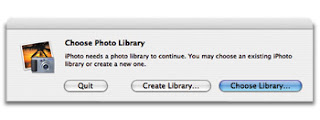
| Missing in Action : If you move your iPhoto library to a new location (to make it easier to share with others), you’ll need to tell iPhoto where to look for it. Hold down the option key while launching the program to bring up the Choose Photo Library dialog box. |
Step 4 The first time you open iPhoto in each account or on each computer, hold down the option key while launching the program. In the Choose Photo Library dialog box that appears (see the screenshot to the right), click on Choose Library. Navigate to the iPhoto Library folder on the external hard drive and click on Open. You should have to do this only once. The next time you open iPhoto, it will know to look on the specified drive for your library.
Tip If the two Macs in question are your own laptop and desktop systems, consider leaving the iPhoto Library folder on the laptop. When you need to access the library from your desktop, connect the two computers via FireWire and then boot the laptop in FireWire Target Disk Mode (hold down the T key while the laptop starts up). You’ll now be able to use it as an external hard drive.
Option 2: Use a Shared Disk Image
Thanks to Mac OS X’s permissions system, sharing resources between two or more user accounts on the same Mac can be a tricky process. Sure, you could place your iPhoto library in an account that every user has access to, but in doing so you’d lose the benefits of individual accounts—personalized workspaces, secure access to personal files and documents, and so on.
If you want to keep user accounts secure but don’t have an external hard drive, you can work around OS X’s permissions conundrum by placing a disk image of your iPhoto library in the Shared folder for other users. A disk image is a special file that OS X treats as though it were an external hard disk, letting you write to and read from it.
So why use a disk image instead of the iPhoto Library folder? If you store the iPhoto Library folder in the Shared folder, iPhoto incorrectly sets permissions on thumbnails for newly imported images. By default OS X ignores permissions on a disk image. The downside of using a disk image is that you’ll have to mount the disk image before each iPhoto session, and unmount it before anyone else can use it.
Step 1 Open Disk Utility (/Applications/Utilities), and click on the New Image button.
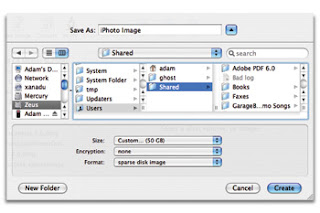
Create a Disk Image When you’re creating a disk image for your iPhoto library, be sure to give yourself plenty of room and to set the Encryption menu to None. Then set the Format menu to Sparse Disk Image. |
Step 2 In the Save As text field, enter a name for the disk image (for example, iPhoto Image), and then save it in the /Users/Shared folder. From the Size pop-up menu, choose Custom. Set the largest imaginable size for your library (don’t skimp— you can’t expand the image later, and choosing a larger size doesn’t use any more space now). Leave Encryption set to None (unless those photos are exceedingly private), and then choose Sparse Disk Image from the Format pop-up menu (see the screenshot on the right). When you’re done, click on Create. Disk Utility will create the disk-image file and mount it as a volume.
Step 3 In the Finder, open the Shared folder (/Users/Shared) and select the new disk image file. Choose File: Get Info to open the Info window.
Step 4 In the Ownership & Permissions pane, click on the Details triangle, and then click on the lock icon next to the Owner pop-up menu. Choose Unknown from the Owner pop-up menu, enter your administrator password when prompted, and then close the Info window.
Step 5 Drag the iPhoto Library folder from the user folder’s Pictures folder to the mounted disk image you just created.
Step 6 In the currently active account, hold down the option key while launching iPhoto. When the Choose Photo Library dialog box appears, click on Choose Library and select the iPhoto Library folder from the mounted disk image.
Step 7 Quit iPhoto. Unmount the disk image by dragging it to the Eject (Trash) icon in the Dock.
Step 8 Switch to the second user account via Fast User Switching. In the Finder, open the Shared folder and double-click on the disk-image file to mount it. Then repeat step 6, so iPhoto knows where to find the iPhoto Library folder. You’ll need to do this for each user who will be accessing the disk image.
When you’re done, every user should be able to launch iPhoto normally. However, each person must mount the disk image before launching iPhoto and must unmount the disk image before anyone else can use it. You can easily automate the process of mounting the disk image and opening iPhoto (go to macworld.com/1263 to download the necessary Automator workflow).
Option 3: Use a Shared Network Volume
If you have multiple Macs networked together via 100BaseT or faster Ethernet, you can give everyone access to a single iPhoto library by plac-ing it on a shared network volume (though you can use an 802.11g wireless network for this, performance may be debilitatingly slow). Here I’ll show you how to use your own Mac to share the iPhoto library. An even better option might be to store the shared iPhoto Library folder on a central file server accessible to all networked Macs. If you go that route, just make sure that everyone is allowed to log in to the server account that holds the iPhoto Library folder.
Step 1 On the Mac that will host the shared iPhoto Library folder, open the Sharing preference pane, turn on the Personal File Sharing option, and click on the Start button.
Step 2 On each remote Mac, open a new Finder window and select the Network icon in the sidebar. Select the name of the host Mac and click on Connect. Enter the user name and password for the account that owns the iPhoto library, and activate the Remember This Password In My Keychain option. In the next dialog box, select your home directory as the volume to mount and click on OK. The network volume will now appear in the Finder’s sidebar.
Step 3 While still on the remote Mac, hold down the option key as you launch iPhoto. Click on Choose Library, and then select the iPhoto Library folder on the shared network volume.
After performing these steps, you and everyone else sharing the iPhoto Library folder can launch iPhoto normally.
One last tip
If you’re comfortable entering Unix commands into Terminal, there’s an easier way to share an iPhoto Library folder across multiple accounts on the same Mac. The secret lies in using Access Control Lists in OSX. For details on setting this up, go here.
courtesy of Adam C. Engst, Macworld.com

Note: This guide is for users of iMovie ‘09 and 1080i video cameras. If you have an older version of iMovie (including iMovie ‘08), this guide won’t work for you. If you have an HD camera that doesn’t shoot in 1080i (such as one of the “Flip” cameras, or most digital still cameras that also shoot HD video), this guide won’t work for you.
By default, Apple’s iMovie ‘09 software will only export video at up to 720p, and at 25fps. (This tutorial will use PAL framerates, but if you live in America or another NTSC country, it will still work for you. Just read 30 instead of 25, and 60 instead of 50.) 1080i video cameras, however, shoot 50 frames a second. It is possible to exploit this interlaced format and end up with 1080p video, optionally at the full 50 frames a second. (Note that you need a very fast Mac to play 1080p50 video. You should probably choose either 1080p25 or 720p50. Alternatively, the Sony Playstation 3 makes an excellent 1080p50 video player.)
Here’s how you can get the most out of your 1080i video camera.
Things you will need:
How to do it:
1. Import your video at “Full” size.
Run iMovie, connect your camera, and wait for the import window to appear. Make sure you choose the “Full - 1920×1080″ option.
Note! You must leave “Analyze for stabilization after import” turned off. Unfortunately, stabilising your video completely destroys the interlacing and so, combined with the “Full” size import, makes exporting HD video completely impossible. Yes, this is stupid. Blame Apple, not me.
2. Edit your movie.
Create a new project and put whatever you want in it. Note that you must not stabilise your video, see above.
3. “Export using QuickTime”.
We’re going to export your video to the “Apple Intermediate Codec”, at the full 1920×1080 size. We need to do this to preserve the interlacing on your video.
a) Choose “Export using QuickTime” in the Share menu.
b) Select “Movie to QuickTime Movie”, and click “Options”.
c) Click “Settings” under Video and set the options to match these:
d) Click “Size” under Video and set the options to match these:
(Note that the sizes marked NTSC/PAL/HD at the start of the name have non-square pixels, so avoid these.)
e) Click “Settings” under Sound and set the options to match these:
f) Turn off “Prepare for internet streaming”. When you’re done, the Movie Settings window should look like this:
g) Click OK, and then click Save. Wait for your video to export.
4. Deinterlace the video with JES Deinterlacer.
a) Run JES Deinterlacer. Click “Choose” and select the video you just exported from iMovie.
b) On the Input tab, set “Block match threshold”. For high quality video with little noise, choose 300. For noisy/fuzzy video (perhaps shot in the dark), choose 600 or higher. For only slightly noisy video pick a figure somewhere between.
c) On the Project tab, make sure “Deinterlace” is set. For 25fps output, choose “Use top field”. For 50fps output, choose “Both fields”. (Please note the disclaimer about playback at the top of this tutorial.) You can optionally turn on the “Local” option. This slightly increases quality, but takes longer to process.
d) Ensure the Output tab looks as below (change the output filename by clicking “Put”, if you wish), and click OK. Wait while your video is deinterlaced.
5. Compress and scale with QuickTime Pro.
Load the video you created with JES Deinterlacer into QuickTime. Select “Export” from the File menu. Choose “Movie to MPEG-4″ and click Options.
a) Change the options on the video tab to match this:
Important: If you want 1080p output instead of 720, change the resolution to “1920 x 1080 HD” and increase the bitrate to 16200.
These two bitrates are suggestions, you can tweak them up or down if you wish.
b) Click Video Options and change the options to match this:
c) Change the options on the audio tab to match this:
d) On the Streaming tab, turn off “Enable streaming”.
Click OK, choose a filename, then click Save.
6. You’re done!
You can delete the two intermediate videos you exported from iMovie and JES Deinterlacer.
courtesy of David Glover


Okay, so I know I'm not the only one who would like to see Apple finally create a stylish all-in-one home media/file server that works, acts, and thinks like a Mac.
It'd be essentially a beefed-up 'Time Capsule' with advanced user-friendly server software, and tons of storage space. I see it maxing out at 8TB(4x 2TB).
It'd be able to share your iTunes, iPhoto, and iMovie libraries across all of your macs, and would allow you to give access to users to edit each library. For instance, if 'user A' updates his/her iPhoto library on their Mac, it simultaneously updates on the whole network, just as if it was a local copy.
It would also have a built-in BitTorrent client. Maybe something based on Transmission, which could be opened as a GUI on any Mac on the network.
Of course GiFi networking would be the bomb, but I think we're still a couple of years away from that. *fingers crossed*